A kitchen sink strainer is very useful. It stops food from going down the drain. This helps keep your pipes clear. Installing a kitchen sink strainer is easy. You can do it yourself. This guide will help you install one step by step.
What You Need
Before you start, gather some tools and supplies. Here is what you will need:
- A kitchen sink strainer
- Plumber’s putty
- A wrench
- A screwdriver
- A bucket
- A clean cloth
Step 1: Prepare Your Work Area
First, clear out the area under your sink. This will give you space to work. Take out any items. Make sure there is good light. You want to see what you are doing.
Step 2: Turn Off the Water
Next, turn off the water supply to your sink. Look for the shut-off valves under the sink. Turn them to the right. This will stop the water from coming out.
Step 3: Remove the Old Strainer
If you have an old strainer, take it out. Place a bucket under the sink. This will catch any water that spills. Use a wrench to unscrew the nut under the sink. Turn it counterclockwise. Once it is loose, you can remove the strainer.
Step 4: Clean the Sink
After removing the old strainer, clean the sink. Wipe the area with a clean cloth. Make sure there is no old putty or debris. A clean surface helps the new strainer fit better.
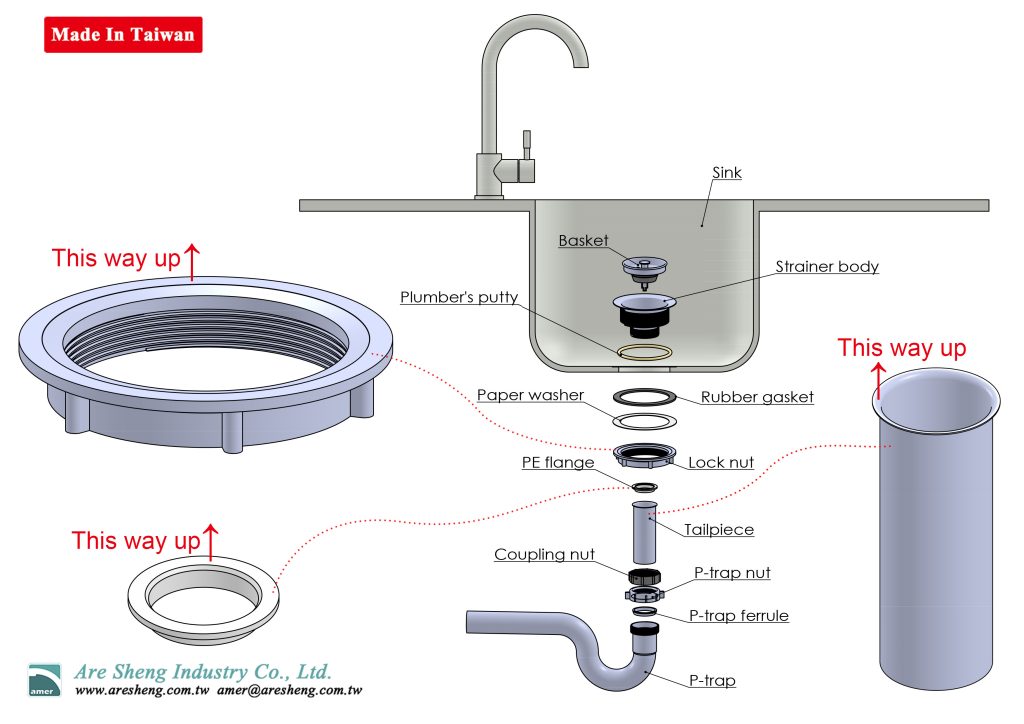
Step 5: Apply Plumber’s Putty
Now it is time to use plumber’s putty. Take a small amount and roll it into a rope. Place the rope around the edge of the new strainer. This will help seal it. Make sure the putty is even all around.
Step 6: Insert the New Strainer
Carefully place the new strainer into the sink hole. Push it down gently. The putty will spread out. This is good. It helps create a tight seal.
Step 7: Secure the Strainer
Now, you need to secure the strainer. Look under the sink. Find the nut that came with your new strainer. Slide it onto the strainer. Use your wrench to tighten it. Turn it clockwise. Do not over-tighten. This can damage the sink.
Step 8: Clean Up Excess Putty
After securing the strainer, check for excess putty. Use your clean cloth to wipe away any extra putty. It is important for a neat look. You can learn How to Clean Kitchen Sink Drain?

Credit: www.aresheng.com.tw
Step 9: Reconnect Water Supply
Now it is time to reconnect the water supply. Go back to the shut-off valves. Turn them to the left to open them. Check for leaks under the sink. If you see any, tighten the nut a little more.
Step 10: Test the Strainer
After everything is connected, test the strainer. Turn on the faucet. Let the water run. Check if it goes down the drain. Make sure it does not leak. If all is good, you did it!
Tips for Success
Here are some tips to help you:
- Be gentle when tightening the nut.
- Always check for leaks after installing.
- Use gloves if you do not like getting your hands dirty.
- If you are unsure, ask someone for help.
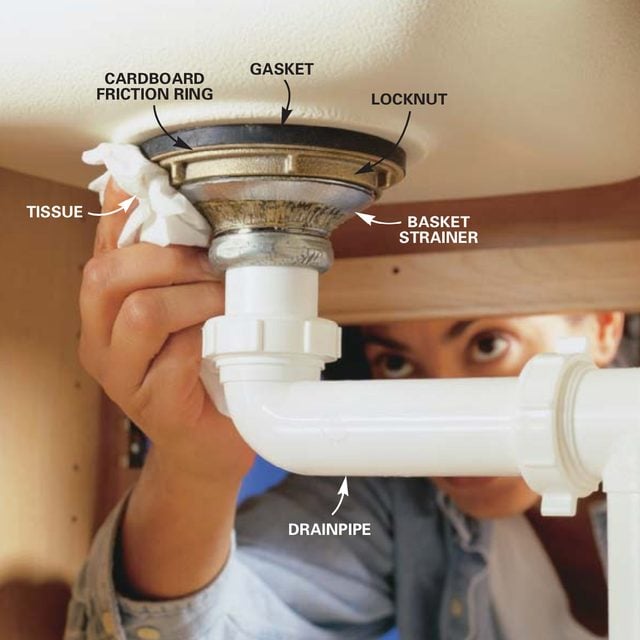
Credit: www.familyhandyman.com
Frequently Asked Questions
How Do I Remove An Old Kitchen Sink Strainer?
To remove an old kitchen sink strainer, unscrew the locknut underneath the sink. Carefully pull out the strainer.
What Tools Do I Need For Installation?
You will need a wrench, plumber’s putty, and a screwdriver. These tools make the job easier.
Can I Install A Kitchen Sink Strainer Myself?
Yes, you can install it yourself. It’s a simple DIY project for most homeowners.
What Type Of Sink Strainer Should I Buy?
Choose a strainer that fits your sink size. Stainless steel is a popular and durable option.
Conclusion
Installing a kitchen sink strainer is simple. You can save money by doing it yourself. Just follow these steps carefully. With practice, you will get better. Enjoy your clean sink! Now, you know how to install a kitchen sink strainer!