A kitchen backsplash is a beautiful addition. It protects your walls from spills and stains. Plus, it adds style. Installing a backsplash can be a fun project. You can do it yourself with some tools and patience.
What is a Backsplash?
A backsplash is a protective wall covering. It usually goes behind sinks and stoves. Backsplashes can be made from many materials. Some common types are:
- Tile
- Glass
- Stainless steel
- Wood
- Paint
Each type has its own look and feel. Choose one that fits your kitchen style.

Credit: www.neathousesweethome.com
Why Install a Backsplash?
A backsplash has many benefits:
- It protects walls from water and food.
- It makes cleaning easy.
- It adds color and design.
- It can increase home value.
These reasons make it a good choice for your kitchen.

Credit: www.youtube.com
Tools and Materials You Will Need
Before starting, gather your tools and materials. Here is a list:
- Measuring tape
- Level
- Tile cutter or wet saw
- Thin-set mortar
- Trowel
- Grout
- Sponge
- Caulk
- Backsplash material
- Safety glasses
- Gloves
Having these items ready will make your work easier.
Steps to Install a Backsplash
Now, let’s go through the steps to install your backsplash.
Step 1: Measure The Area
First, measure the area for the backsplash. Use a measuring tape. Write down the dimensions. Make sure to account for outlets and switches. This will help you know how much material you need.
Step 2: Prepare The Wall
Next, clean the wall where the backsplash will go. Remove dirt and grease. If the wall is uneven, you may need to fix it. Use a level to check the surface. The wall must be flat for the best results.
Step 3: Plan Your Design
Before sticking anything, lay out your design. Use the tiles or material you chose. This is a good way to see how it looks. You can adjust the pattern if needed. Planning helps avoid mistakes later.
Step 4: Apply Thin-set Mortar
Once your design is ready, it’s time to apply mortar. Use a trowel to spread thin-set mortar on the wall. Start from one corner and work your way across. Be sure to apply an even layer. This will help the tiles stick well.
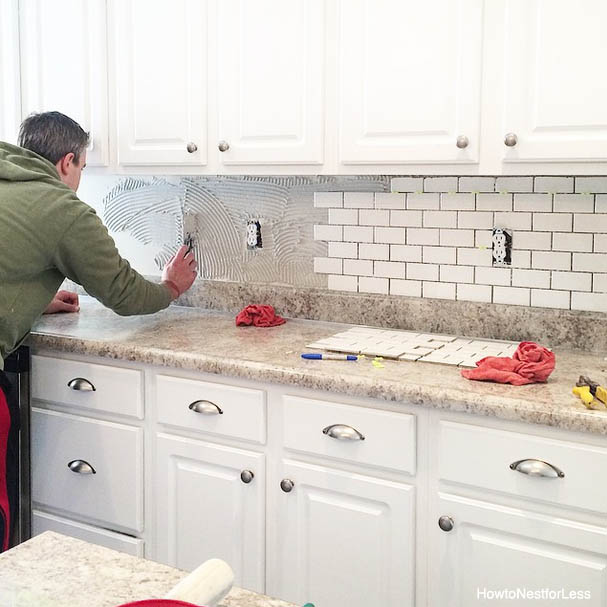
Step 5: Install The Backsplash
Now, place the backsplash material onto the mortar. Press it firmly. Leave spaces between tiles for grout. Use spacers if needed. Check with a level to make sure everything is straight. This is important for a neat look.
Step 6: Cut Tiles As Needed
Sometimes, you will need to cut tiles. Use a tile cutter or wet saw for this. Follow the measuring marks you made. Wear safety glasses and gloves when cutting. This keeps you safe from sharp edges.
Step 7: Allow To Dry
After placing all the tiles, let the mortar dry. This can take up to 24 hours. Be patient. Do not touch the tiles during this time. This helps everything set correctly.
Step 8: Grout The Spaces
Once the mortar is dry, it’s time to grout. Mix the grout according to the package instructions. Use a rubber float to spread the grout into the spaces. Wipe off any extra grout on the tiles. This step makes your backsplash look clean.
Step 9: Clean The Backsplash
After the grout has dried, clean the tiles. Use a damp sponge to remove any haze. This will help the tiles shine. Make sure everything looks neat and tidy.
Step 10: Caulk The Edges
Finally, apply caulk around the edges. This seals the area and prevents water damage. Use a caulk gun and smooth the caulk with your finger. Make sure there are no gaps.
Tips for a Successful Installation
Here are some tips to help you:
- Take your time. Rushing can lead to mistakes.
- Use a level often to check your work.
- Don’t skip the cleaning steps. A clean surface is important.
- Read all instructions for the materials you use.
- Ask a friend for help if needed. It can make the work easier.
Common Mistakes to Avoid
Many people make mistakes during installation. Here are some common ones:
- Not measuring correctly. This can lead to wasted materials.
- Using too much or too little mortar. This affects how well tiles stick.
- Not letting the mortar dry. This can cause tiles to shift.
- Forgetting to seal edges. This can lead to water damage.
Be aware of these mistakes to ensure a better job. You can learn How to decorate a a kitchen?
Frequently Asked Questions
What Tools Do I Need To Install A Kitchen Backsplash?
You will need a measuring tape, tile cutter, adhesive, grout, and a sponge.
How Long Does It Take To Install A Backsplash?
It usually takes a few hours to a day, depending on the size.
Can I Install A Backsplash Myself?
Yes, many homeowners successfully install their own backsplashes with the right tools.
What Type Of Backsplash Is Easiest To Install?
Peel-and-stick tiles are the easiest option for DIY installation.
Conclusion
Installing a backsplash in your kitchen is a fun project. With the right tools and steps, you can do it yourself. Remember to measure, plan, and take your time. This project can enhance your kitchen’s beauty. It also protects your walls. Enjoy your new backsplash and the fresh look it brings!
FAQs
How Long Does It Take To Install A Backsplash?
The installation can take one to two days. Most of the time is for drying.
Can I Install A Backsplash Over Existing Tile?
Yes, but ensure the old tile is clean and secure. This helps the new material stick.
What Type Of Backsplash Is Easiest To Install?
Peel-and-stick backsplashes are easy for beginners. They do not need mortar or grout.
How Do I Clean My Backsplash?
Use a mild cleaner and a soft cloth. Avoid abrasive materials that can scratch.
Can I Change My Backsplash Later?
Yes, backsplashes can be removed and replaced. Just follow the installation steps again.