Changing a kitchen sink faucet can seem hard. But, it is not. With the right tools and steps, you can do it. This guide will help you. We will go through each step clearly. Let’s get started!
Why Change Your Faucet?
There are many reasons to change your faucet:
- Your faucet leaks water.
- It is old and rusty.
- You want a new look in your kitchen.
- It does not work well anymore.
Changing your faucet can help save water. It can also improve the look of your kitchen. Now, let’s look at what you need to do this job.
Tools You Will Need
Before you start, gather your tools. Here is a list:
- Adjustable wrench
- Screwdriver (flat and Phillips)
- Bucket
- Towel or rag
- Plumber’s tape
- New faucet
Make sure you have everything ready. This will make the job easier.
Steps to Change Your Faucet
Now, let’s go through the steps to change your faucet.
Step 1: Turn Off The Water Supply
First, you need to turn off the water. Look under your sink. You will find two shut-off valves. One is for hot water. The other is for cold water. Turn both valves to the right. This will stop the water flow.
Step 2: Drain The Old Faucet
Next, open the faucet. This will help drain any water left. Let it run until no more water comes out. Place a bucket under the sink. This will catch any water that spills.
Step 3: Disconnect The Old Faucet
Now it is time to remove the old faucet. Use the adjustable wrench. Look for the nuts that hold the faucet in place. They are usually under the sink.
Be careful. These nuts can be tight. Turn them counterclockwise to loosen. Once they are loose, you can take them off. Keep all parts in a safe place.
Step 4: Remove The Old Faucet
After you take off the nuts, you can lift the old faucet out. Check to see if there are any old gaskets. If so, remove them. Clean the area where the new faucet will go.
Step 5: Prepare The New Faucet
Now, it is time to get the new faucet ready. Take it out of the box. Read the instructions that come with it. Every faucet is different. Make sure you understand how it fits together.
Step 6: Install The New Faucet
Place the new faucet into the hole in the sink. Make sure it is centered. Then, put the gasket on top. This will help stop leaks.
Now, from under the sink, take the nuts you saved. Put them back on the faucet. Use the wrench to tighten them. Make sure it is snug but do not over-tighten.
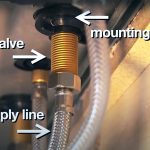
Step 7: Connect The Water Supply Lines
Next, look for the water supply lines. These are the tubes that bring water to the faucet. Connect them to the new faucet. Use plumber’s tape on the threads. This will help stop leaks.
Turn the nuts clockwise to tighten. Be careful not to damage the threads. Make sure everything is secure.
Step 8: Turn The Water Supply Back On
Once everything is connected, it is time to turn the water back on. Go back to the shut-off valves. Turn them to the left. This will let the water flow again.
Step 9: Check For Leaks
Now, check for leaks. Turn on the new faucet. Let the water run for a minute. Look under the sink and around the faucet. If you see water, you may need to tighten some connections.
Step 10: Clean Up
After you are sure there are no leaks, clean up your work area. Put away your tools. Make sure the bucket is empty. Wipe down the sink and the new faucet.

Credit: www.homedepot.com
Tips for a Successful Faucet Change
Here are some tips to help you:
- Work in a well-lit area.
- Have someone help if needed.
- Read all instructions carefully.
- Take your time. Rushing can cause mistakes.
Common Problems and Solutions
Sometimes things do not go as planned. Here are some common problems:
Problem: Water Still Leaks
Check all connections. Make sure everything is tight. Look for any damaged parts.
Problem: Faucet Does Not Turn On
Make sure the water supply is on. Check for kinks in the supply lines.
Problem: Low Water Pressure
Check the aerator. Clean it if it is clogged. Make sure the supply lines are clear.

Credit: www.youtube.com
Frequently Asked Questions
How Do I Know If My Faucet Needs Replacing?
Signs of a bad faucet include leaks, rust, and low water pressure. Check for any drips or strange noises.
What Tools Do I Need To Change A Faucet?
Common tools include a wrench, screwdriver, pliers, and a basin wrench. These will help you easily remove the old faucet.
Can I Change A Kitchen Faucet Myself?
Yes, many people can change a kitchen faucet with basic tools. Follow a guide to help you through the steps.
How Long Does It Take To Replace A Faucet?
Replacing a faucet usually takes about 1 to 2 hours. The time depends on your skill level and the faucet type.
Conclusion
Changing a kitchen sink faucet is not hard. With this guide, you can do it yourself. Just follow each step carefully. Gather your tools and take your time. Soon, you will have a new faucet. Enjoy your new look and save water!
If you have any questions, feel free to ask. Happy fixing!