Installing a kitchen sink and garbage disposal can be easy. With the right tools and steps, you can do it yourself. This guide will help you through the process. You will learn what you need, how to prepare, and how to install both items.
Why Install a New Sink and Disposal?
There are many reasons to install a new sink and garbage disposal.
- Your old sink may leak.
- You may want a bigger sink.
- A new sink can improve your kitchen’s look.
- A garbage disposal can help reduce waste.
Tools and Materials Needed
Before you start, gather your tools and materials. Here is what you need:
- Adjustable wrench
- Screwdriver
- Pliers
- Drill
- Pipe wrench
- Plumber’s putty
- New sink
- Garbage disposal
- Sink mounting clips
- Drain assembly
- Water supply lines
Preparing for Installation
Before you install the sink and disposal, you need to prepare.
1. Turn Off The Water
Locate the water shut-off valves. These are usually under the sink. Turn them off. This prevents any leaks or spills.
2. Remove The Old Sink
First, disconnect the drain pipes. Use a pipe wrench for this. Next, remove the clips that hold the sink. Lift the old sink out carefully. You may need help to lift it.
3. Clean The Area
After you remove the sink, clean the area. Remove any old putty or debris. Make sure the surface is smooth.
Installing the New Sink
Now, it is time to install your new sink.
1. Place The Sink
Set the new sink into the hole. Make sure it fits well. Check that it is level. Adjust if needed.
2. Secure The Sink
Use sink mounting clips to hold it in place. Follow the instructions that come with the sink. Tighten the clips until the sink is stable.
3. Apply Plumber’s Putty
Take some plumber’s putty. Roll it into a rope shape. Place it around the sink’s drain hole. This helps create a seal.
4. Install The Drain Assembly
Insert the drain into the hole. Press down firmly. Secure it with the provided locknut. Tighten it with a wrench.
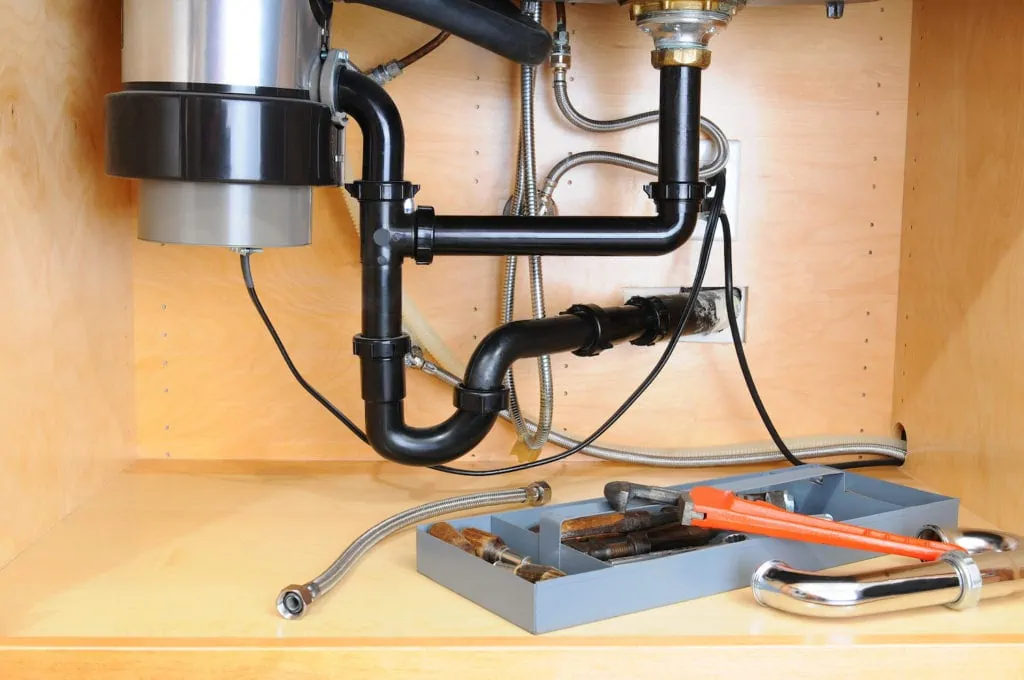
Installing the Garbage Disposal
Once the sink is in place, you can install the garbage disposal.
1. Prepare The Disposal
First, unpack the garbage disposal. Read the instruction manual carefully. Make sure you understand the parts.
2. Attach The Mounting Ring
Find the mounting ring. It usually comes with the disposal. Place it on the sink’s drain opening. Twist it to lock it in place.
3. Connect The Disposal
Lift the garbage disposal and align it with the mounting ring. Twist it to lock it in place. Make sure it is secure.
4. Connect The Drain Pipe
Locate the drain pipe that goes to the disposal. Connect it to the disposal outlet. Tighten it with a wrench.
5. Connect The Dishwasher (if Needed)
If you have a dishwasher, you can connect it too. Find the dishwasher inlet on the disposal. Remove the plug if there is one. Attach the dishwasher hose securely.
Credit: 4frontenergy.com
Plumbing Connections
Next, you will connect the plumbing.
1. Connect The Water Supply
Locate the water supply lines. Attach them to the faucet and disposal. Use an adjustable wrench to tighten them.
2. Check For Leaks
Turn the water supply back on. Check for any leaks under the sink. If you see any, tighten the connections.
Electrical Connections for Garbage Disposal
Now, it is time to connect the power for the garbage disposal.
1. Turn Off The Power
Before you start, turn off the power at the circuit breaker. This keeps you safe while working.
2. Connect The Wiring
Remove the cover plate from the disposal. Connect the black wire to the black wire. Connect the white wire to the white wire. Secure them with wire nuts.
3. Attach The Ground Wire
Find the green ground wire. Attach it to the green screw inside the disposal. This keeps the unit safe.
4. Replace The Cover Plate
After connecting the wires, replace the cover plate. Secure it with screws.
Final Steps
You are almost done! Follow these last steps.
1. Test The Garbage Disposal
Turn the power back on. Press the reset button on the disposal. Test it by turning it on. Ensure it runs smoothly.
2. Test The Sink
Turn on the faucet to test the sink. Check for leaks under the sink. If you see any, fix them now.
3. Clean Up The Area
Remove any tools and debris from the area. Make sure everything is neat. Dispose of old parts properly.
Safety Tips
Keep these safety tips in mind during installation:
- Always turn off the water and power before starting.
- Use tools safely and as directed.
- If you feel unsure, ask for help.
:max_bytes(150000):strip_icc()/garbage-disposal-installation-1824830-hero-1dcd7b5b05d44a2cb367e31692500c8c.jpg)
Credit: www.thespruce.com
Frequently Asked Questions
How Do I Prepare To Install A Kitchen Sink?
Gather all tools and materials first. Check the sink and disposal instructions. Clear the workspace for easy access.
What Tools Do I Need For Installation?
You need a wrench, screwdriver, pliers, and a bucket. Also, have plumber’s putty and tape ready.
How Do I Remove The Old Sink?
Turn off the water supply. Disconnect the drain and water lines. Carefully unscrew the sink from the countertop.
How Do I Install A New Kitchen Sink?
Position the sink in the counter hole. Secure it with clips. Connect the water lines and drain.
Conclusion
Installing a kitchen sink and garbage disposal can be rewarding. You save money and learn a new skill. Follow the steps in this guide carefully. You will have a new sink and disposal in no time.
Remember to take your time. Don’t rush through the process. Enjoy your new kitchen updates!