
Installing an undermount kitchen sink can be a fun project. It helps to save space and looks nice. This guide will show you how to do it step by step.
What is an Undermount Sink?
An undermount sink is attached under the countertop. It gives a clean look. The edges of the sink are not visible. This type of sink is popular in many kitchens.
Tools and Materials You Need
Before you start, gather your tools and materials. Here is a list:
- Undermount kitchen sink
- Silicone sealant
- Mounting brackets
- Caulking gun
- Drill
- Screwdriver
- Measuring tape
- Level
- Plumber’s putty
- Safety glasses
Step 1: Prepare the Area
First, clear the area where the sink will go. Remove the old sink if there is one. Clean the countertop well. Make sure it is dry and smooth. This will help the new sink stick better.

Credit: www.youtube.com
Step 2: Measure the Sink Space
Use a measuring tape to check the size of your sink. Measure the opening in the countertop. Make sure the new sink will fit. It should match the size of the opening.
Step 3: Mark the Mounting Points
Next, place the sink upside down on the countertop. Use a pencil to mark where the sink will go. Make sure it is even. Use a level to check it. This is important for a good fit.
Step 4: Apply Silicone Sealant
Now it’s time to apply the silicone sealant. Run a bead of sealant along the edge of the sink. This will help keep water from leaking. Be careful to make it even.
Step 5: Position the Sink
Lift the sink and place it under the countertop. Align it with the marks you made. Press it gently against the countertop. Make sure it is straight and level.
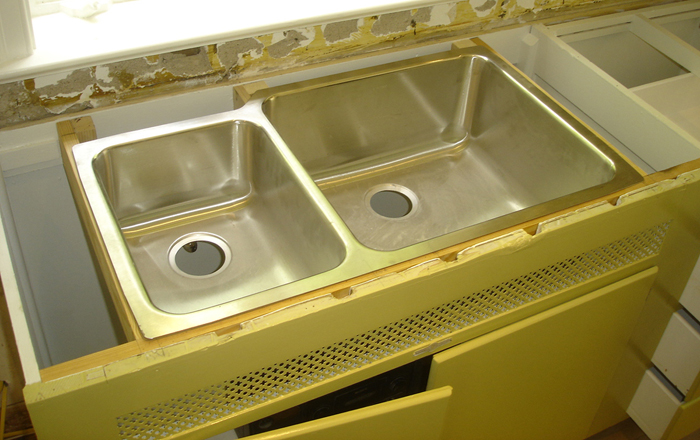
Step 6: Secure the Sink
Use the mounting brackets to secure the sink. Follow the instructions that come with the sink. Usually, you will need to drill holes into the countertop.
Attach the brackets tightly. This will hold the sink in place. Check again with the level. It should be straight.
Credit: concretecountertopinstitute.com
Step 7: Add Plumber’s Putty
Now, take plumber’s putty and roll it into a rope. Place this rope around the drain hole. This will help seal the area where water flows out. Press it down gently.
Step 8: Install the Drain Assembly
Next, install the drain assembly. Follow the instructions that came with the sink. Make sure it fits tightly. This will prevent leaks.
Step 9: Connect the Plumbing
Once the drain assembly is in place, connect the plumbing. Attach the water supply lines. Make sure to tighten all connections. You don’t want any leaks.
Step 10: Test for Leaks
Now it is time to test for leaks. Turn on the water slowly. Check all the connections. Look for any signs of water. If you see any leaks, tighten the connections.
Step 11: Clean Up
After everything is done, clean up the area. Remove any excess sealant or putty. Make sure the sink area looks nice and tidy.
Maintenance Tips for Your Undermount Sink
To keep your undermount sink looking great, follow these tips:
- Clean it regularly with mild soap.
- Avoid harsh chemicals that can damage the finish.
- Wipe up spills quickly to prevent stains.
- Use a soft cloth to avoid scratches.
Frequently Asked Questions
How Do I Prepare For Installing An Undermount Sink?
Start by gathering tools like a drill, silicone, and a level. Measure your countertop and sink properly.
What Tools Do I Need To Install An Undermount Sink?
You will need a drill, a wrench, silicone adhesive, and a level. These tools will help you install easily.
Can I Install An Undermount Sink Myself?
Yes, many homeowners install undermount sinks themselves. Just follow the steps carefully for best results.
How Do I Seal An Undermount Sink?
Apply silicone adhesive around the edge of the sink. Press it against the countertop to create a seal.
Conclusion
Installing an undermount kitchen sink can be easy. With the right tools, you can do it yourself. Follow these steps carefully. Soon, you will have a beautiful new sink.
Remember to take your time. If something feels hard, ask for help. Enjoy your new sink and the space it creates in your kitchen!
Frequently Asked Questions
1. Can I Install An Undermount Sink By Myself?
Yes, you can install it yourself if you follow the steps.
2. Do I Need Special Tools?
You need basic tools like a drill and screwdriver.
3. How Long Does It Take To Install?
It usually takes a few hours to complete the job.
4. What If I Find A Leak After Installation?
Tighten the connections and check for any loose parts.
5. Can I Use Any Sink With My Countertop?
Make sure the sink size matches your countertop opening.