Installing a backsplash in your kitchen can be fun. It adds color and style. You can do it yourself. This guide will show you how. Let’s start with the basics.
What is a Backsplash?
A backsplash is the area behind your kitchen sink and stove. It protects the wall from water and stains. It also makes your kitchen look nice. Backsplashes come in many materials. You can find them in tiles, glass, or metal. Choose what fits your style and budget.
Why Install a Backsplash?
There are many reasons to install a backsplash:
- It protects your walls from spills.
- It makes cleaning easier.
- It adds beauty to your kitchen.
- It can increase your home value.
Tools and Materials Needed
Before you start, gather your tools and materials. Here is a list:
- Tiles or backsplash material
- Tile cutter or wet saw
- Thin-set mortar
- Notched trowel
- Grout
- Grout float
- Sponges
- Level
- Pencil
- Measuring tape
- Safety glasses
- Bucket

Credit: www.youtube.com
Step 1: Measure the Area
First, measure the area for your backsplash. Use a measuring tape. Write down the width and height. Multiply these numbers. This will give you the total area. You need this to buy enough tiles.
Step 2: Choose Your Design
Next, pick a design that you love. You can choose different colors and patterns. Think about how it will look in your kitchen. You can draw a simple sketch if it helps.
Step 3: Prepare the Wall
Make sure the wall is clean and smooth. Remove any old wallpaper or paint. You want a flat surface for the tiles. If there are holes, fill them with spackle. Let it dry before you start tiling.
Step 4: Dry Fit the Tiles
Before you apply anything, dry fit the tiles. Lay them out on the counter. This helps you see how they will look. Adjust the tiles if needed. Make sure the pattern is right.

Credit: www.neathousesweethome.com
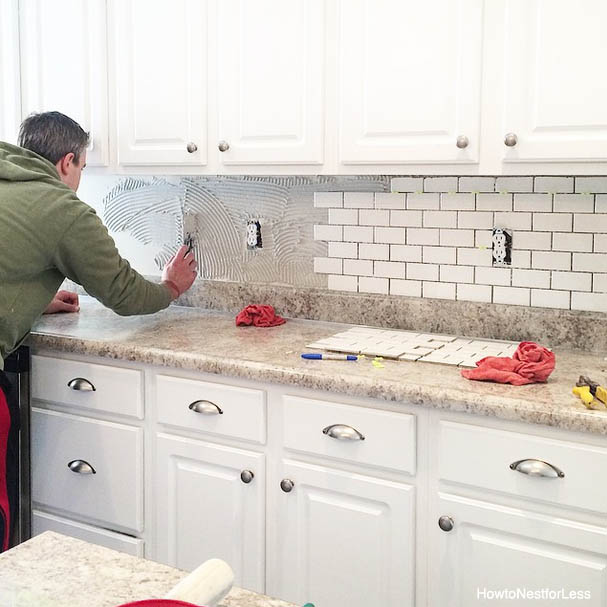
Step 5: Apply Thin-Set Mortar
Now it’s time to apply thin-set mortar. Use a notched trowel for this. Spread the mortar on a small section of the wall. Hold the trowel at a 45-degree angle. This helps create ridges. The ridges help the tiles stick better.
Step 6: Place the Tiles
Press the first tile into the mortar. Twist it a little to make sure it sticks. Place spacers between the tiles. This keeps them even. Continue this process until you cover the area. Check with a level. Make sure everything is straight.
Step 7: Cut Tiles as Needed
Some tiles may need cutting. Use a tile cutter or wet saw. Measure the space carefully. Mark the tile with a pencil. Cut slowly and wear safety glasses. This will help protect your eyes.
Step 8: Let the Mortar Dry
After placing all the tiles, let the mortar dry. This usually takes about 24 hours. Don’t rush this step. Make sure everything is set before moving on.
Step 9: Apply Grout
Once the mortar is dry, it’s time for grout. Use a grout float to apply it. Spread the grout over the tiles. Fill all the gaps between the tiles. Don’t worry about being perfect.
Step 10: Clean Excess Grout
After applying grout, clean the excess. Use a damp sponge to wipe the tiles. Be gentle not to remove grout from the spaces. Rinse the sponge often. Let the grout dry for about 30 minutes.
Step 11: Final Cleanup
After 30 minutes, clean the tiles again. Use a dry cloth to buff the tiles. This will make them shine. Check for any missed spots. If you see any, fix them quickly.
Step 12: Seal the Grout
Once the grout is completely dry, you should seal it. This helps protect against stains. Use a grout sealer and follow the instructions. Apply it evenly over the grout lines.
Step 13: Enjoy Your New Backsplash
Congratulations! You have installed your backsplash. Step back and admire your work. Your kitchen looks more beautiful now. Enjoy cooking and spending time in your new space.
Tips for Success
Here are some extra tips to help you:
- Take your time during each step.
- Read all instructions carefully.
- Ask a friend for help if needed.
- Wear protective gear when cutting tiles.
- Be patient and have fun!
Frequently Asked Questions
How Do I Choose The Right Backsplash Material?
Choose a material that matches your kitchen style. Popular options include tile, glass, and stone.
What Tools Do I Need For Backsplash Installation?
You need a tile cutter, adhesive, grout, and a trowel. A level and sponge can help too.
How Long Does It Take To Install A Kitchen Backsplash?
Installation usually takes a few hours to a day. It depends on the size and complexity of the project.
Can I Install A Backsplash Over Existing Tiles?
Yes, you can install over existing tiles. Make sure the surface is clean and smooth for better adhesion.
Conclusion
Installing a backsplash in your kitchen is easy. With the right tools and steps, you can do it. Follow this guide, and you will have a beautiful kitchen. Enjoy your new space and all the memories you will create there!