Installing a kitchen sink sprayer can be easy. It helps you clean dishes better. You can also wash fruits and vegetables. This guide will show you how to do it step by step. Follow these simple instructions. You will save time and effort.
What You Will Need
Before you start, gather your tools and materials. Here is a list:
- New kitchen sink sprayer
- Adjustable wrench
- Screwdriver
- Bucket
- Towels or rags
- Plumber’s tape
Credit: www.wayfair.com
Steps to Install a Kitchen Sink Sprayer
Now, let’s get started. Follow these steps carefully.
Step 1: Turn Off The Water Supply
Before you do anything, turn off the water. Look for the shut-off valves under the sink. Turn them clockwise. This stops the water flow. It keeps you dry while working.
Step 2: Remove The Old Sprayer
If you have an old sprayer, take it out. First, disconnect the hose. Use the adjustable wrench to loosen the nut. Be careful not to drop it. Place a bucket under the sink. It will catch any water.
Step 3: Clean The Area
After removing the old sprayer, clean the area. Use towels or rags to wipe. Make sure there is no dirt or old tape. A clean space helps the new sprayer work better.
Step 4: Prepare The New Sprayer
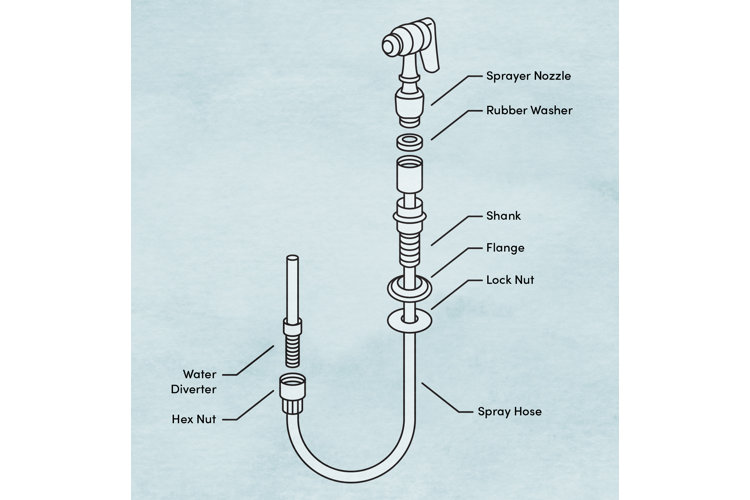
Take your new kitchen sink sprayer. Check all parts are there. You should have a sprayer, hose, and connector. Read the instructions that come with it. It will help you understand how to install.
Step 5: Attach The Hose
Find the end of the hose. It will connect to the sprayer. Screw it on tightly. Use plumber’s tape on the threads. This prevents leaks. Wrap the tape around the threads before you screw the hose on.
Step 6: Connect The Hose To The Faucet
Now, take the other end of the hose. Connect it to the faucet. Again, use plumber’s tape. This is very important. Turn the nut clockwise to tighten it. Make sure it is secure but do not over-tighten.
Step 7: Install The Sprayer
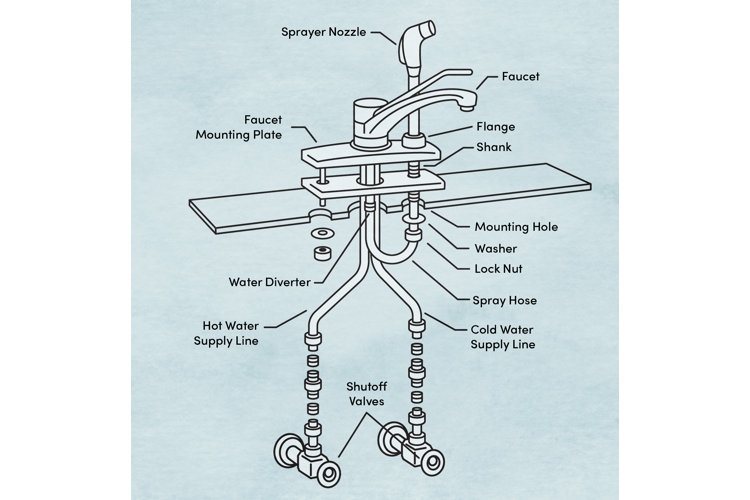
Next, install the sprayer. If your sink has a hole, place the sprayer in it. If not, you might need to drill a new hole. Make sure it fits snugly. Use the screws that came with the sprayer to secure it.
Step 8: Turn On The Water Supply
After everything is in place, turn the water back on. Go under the sink and turn the shut-off valves counterclockwise. Check for leaks. If you see water, tighten the connections. Always check carefully.
Step 9: Test The Sprayer
Now, test your new sprayer. Pull the handle and spray water. Make sure it works well. If there are no leaks, you did it right. Enjoy using your new kitchen sink sprayer.
Tips for a Smooth Installation
Here are some extra tips. They will help you install the sprayer easily.
- Always read the instructions.
- Use a bucket to catch any water.
- Keep towels handy for spills.
- Work slowly and carefully.
- Ask a friend for help if needed.
:max_bytes(150000):strip_icc()/installing-a-kitchen-sink-sprayer-2718817-08-542227654c8b4da9a8e39bb839f55989.jpg)
Credit: www.thespruce.com
Common Mistakes to Avoid
Sometimes people make mistakes. Avoid these common ones:
- Not turning off the water supply.
- Forgetting plumber’s tape.
- Over-tightening connections.
- Ignoring leaks.
- Not testing the sprayer after installation.
Frequently Asked Questions
How Do You Install A Kitchen Sink Sprayer?
To install a kitchen sink sprayer, first turn off the water supply. Remove the old sprayer if needed. Follow the sprayer’s instructions to connect it to the sink faucet. Secure the hose and test for leaks.
What Tools Do I Need For Installation?
You will need a wrench, screwdriver, and pliers. A towel may help for spills. These tools make the job easier and faster.
Can I Install A Sprayer Without A Plumber?
Yes, you can install a sprayer yourself. With basic tools and instructions, it’s a simple task. Just follow the steps carefully.
How Long Does It Take To Install?
Installing a kitchen sink sprayer usually takes about 30 minutes. This depends on your experience and the model you choose.
Conclusion
Installing a kitchen sink sprayer is a great DIY project. It does not take much time or skill. With the right tools and steps, you can do it yourself. Follow the instructions carefully. Remember the tips and avoid mistakes. Enjoy your new sprayer in the kitchen. Happy cleaning!